花了一些時間研究了iRedMail (其實就是Postfix+Dovecot+Roundcube),看起來都有符合公司使用條件,以下是安裝紀錄
1.安裝事前準備
2.安裝iRedMail
2-1.開啟roundcubemail 後發現Email變成[email protected] 問題
2-2.關閉SPAM & 掃毒功能
2-3.客製登入頁面
3.設定SMTP SASL
4.結合AD認證
4-1.透過WebMail修改AD密碼
4-2.限制使用者Email空間大小
4-3.限制使用者單封信件大小
4-4.限制roundcubemail夾帶檔案大小
5.設定SSL憑證
5-1.取得Let’s Encrypt憑證
5-2.設定Nginx SSL憑證
5-3.設定Postfix SSL憑證
5-4.設定Dovecot SSL憑證
5-5.自動更新憑證
6.查詢Email Log
6-1.查找收件人
6-2.查找IP
1.安裝事前準備
設定IP
#vi /etc/sysconfig/network-scripts/ifcfg-ens192
TYPE=Ethernet
BOOTPROTO=static
IPADDR=172.16.1.4
NETMASK=255.255.255.0
NAME=ens192
DEVICE=ens192
ONBOOT=yes
DNS1=168.95.1.1
設定Gateway
#vi /etc/sysconfig/network
GATEWAY=172.16.1.1
預設CentOS7 把ifconfig netstat…基本網路指令給移除了,有使用到再把它安裝回來
#yum install net-tools tcpdump
安裝bzip2
#yum install bzip2
For Xshell 傳檔使用
#yum install lrzsz
For Telnet 測試
#yum install telnet
關閉selinux
#vi /etc/selinux/config
SELINUX=disabled
設定Hosts
#vi /etc/hosts
172.16.1.4 mail.smarter.com.tw
127.0.0.1 mail.smarter.com.tw
::1 localhost localhost.localdomain localhost6 localhost6.localdomain6
更改hostname
#hostnamectl set-hostname mail.smarter.com.tw
2.安裝iRedMail
#tar -xjf iRedMail-0.9.5-1.bz2
#cd /root/iRedMail-x.y.z/
#bash iRedMail.sh
開始安裝畫面
選擇Yes

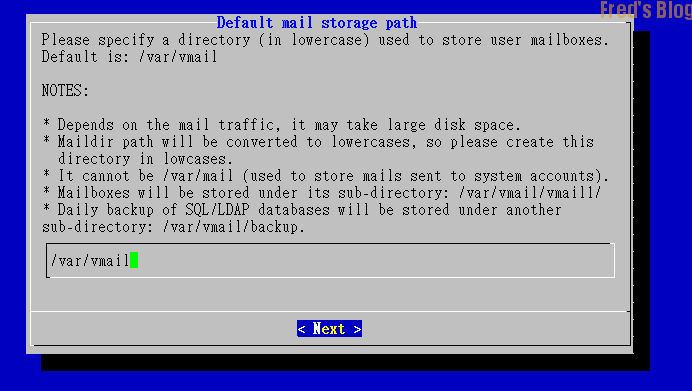
安裝預設路徑/var/vmail
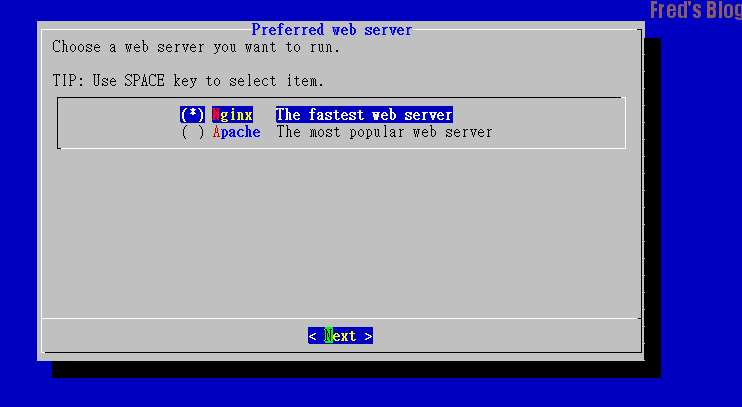
使用 nginx當Web Server
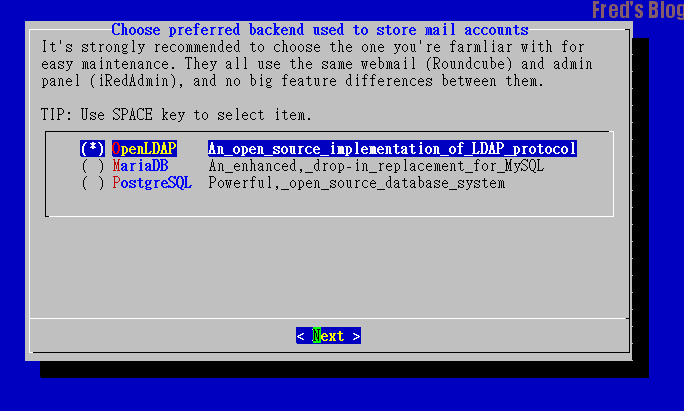
待會需要結合AD,需選擇OpenLDAP
LDAP 尾碼 dc=smarter,dc=com,dc=tw

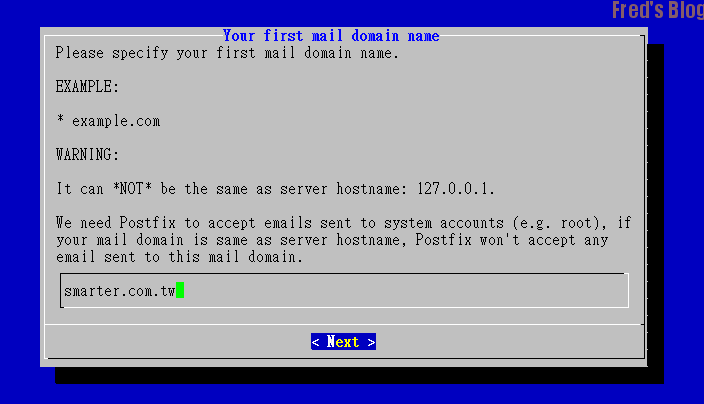
收信的網域名稱 smarter.com.tw
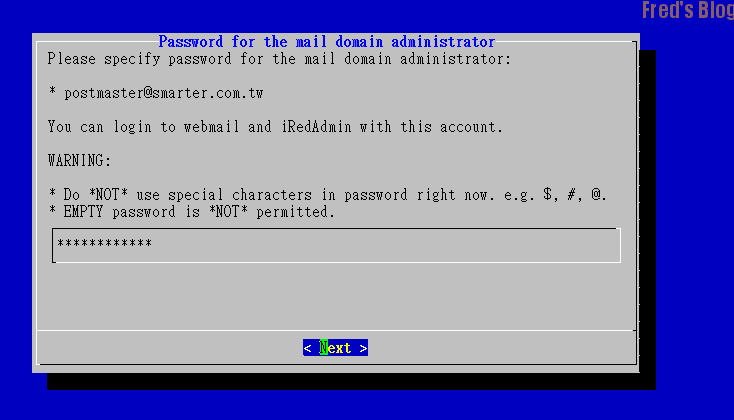
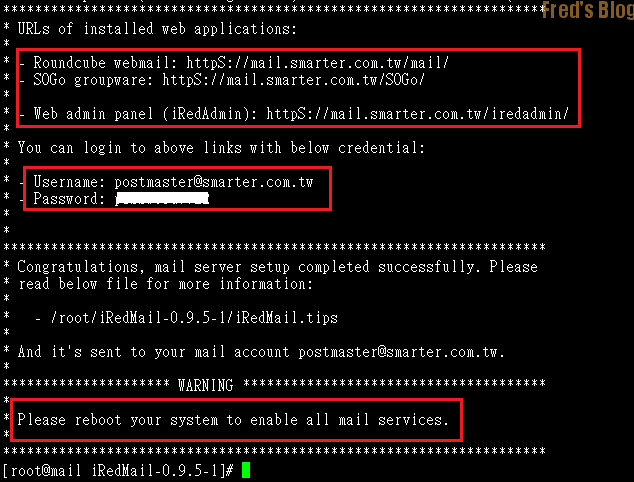
預設最高管理權限帳號是[email protected] , 須設定密碼
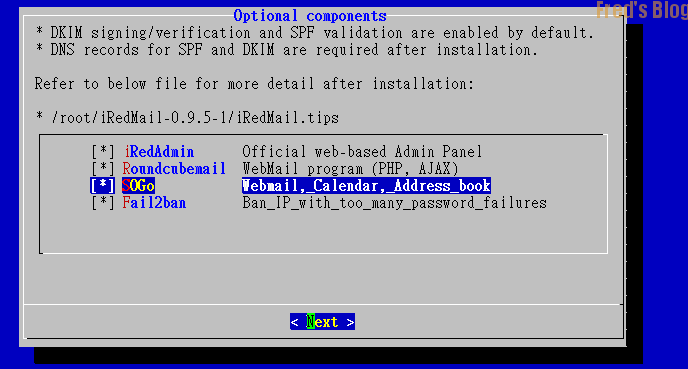
安裝套件,全部安裝
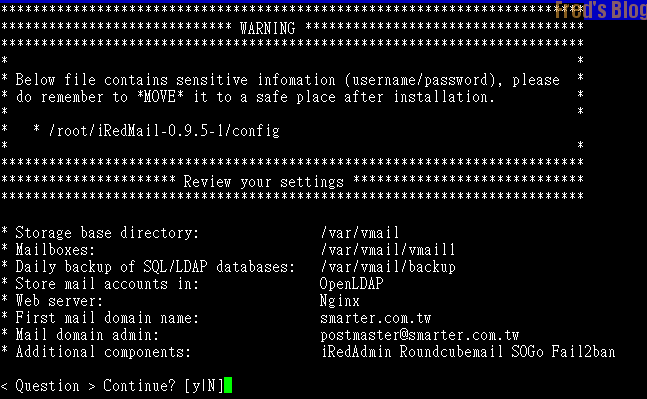
再次確認所有設定,選擇Y,確認安裝
安裝過程會詢問SSH是否需要開啟 & 設定MySQL ,選擇Y
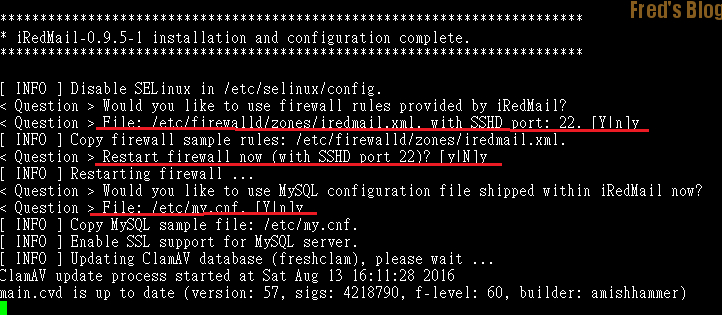
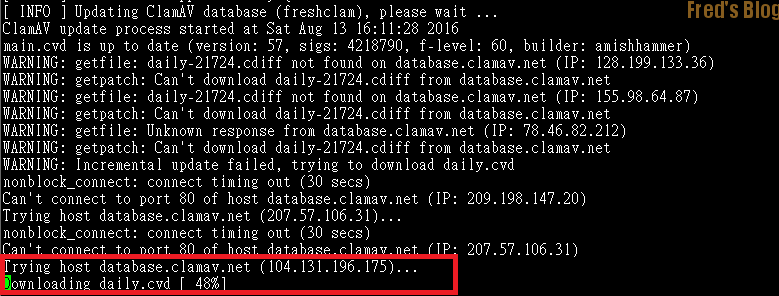
過程中會自動更新ClamAV病毒碼,需要一些時間
安裝完成後須重新開機
2-1.開啟roundcubemail 後發現Email變成[email protected] 問題
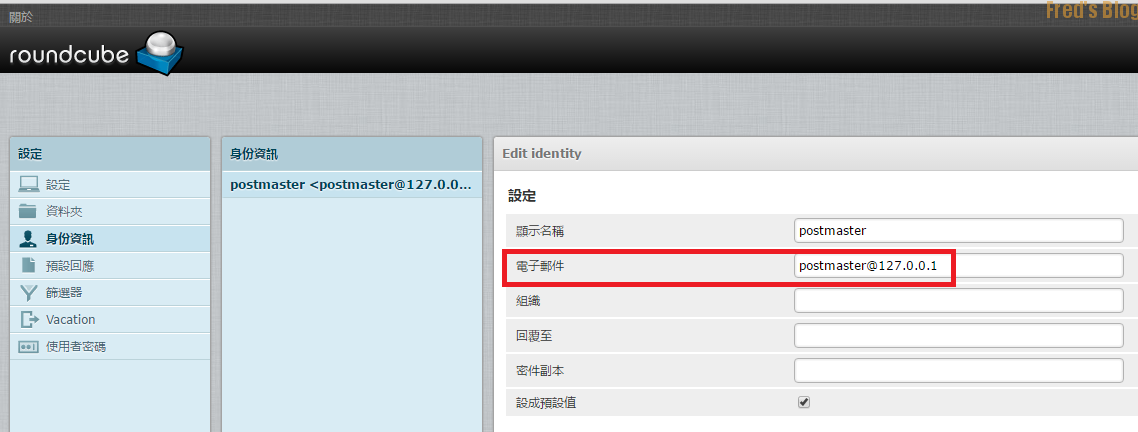
修改roundcubemail 上的config.inc.php
#vi /var/www/roundcubemail/config/config.inc.php
// SYSTEM
$config['force_https'] = true;
$config['login_autocomplete'] = 2;
$config['ip_check'] = true;
$config['des_key'] = 'wlcsDYzLFcI6imdpiOaztrNW';
$config['useragent'] = 'Roundcube Webmail'; // Hide version number
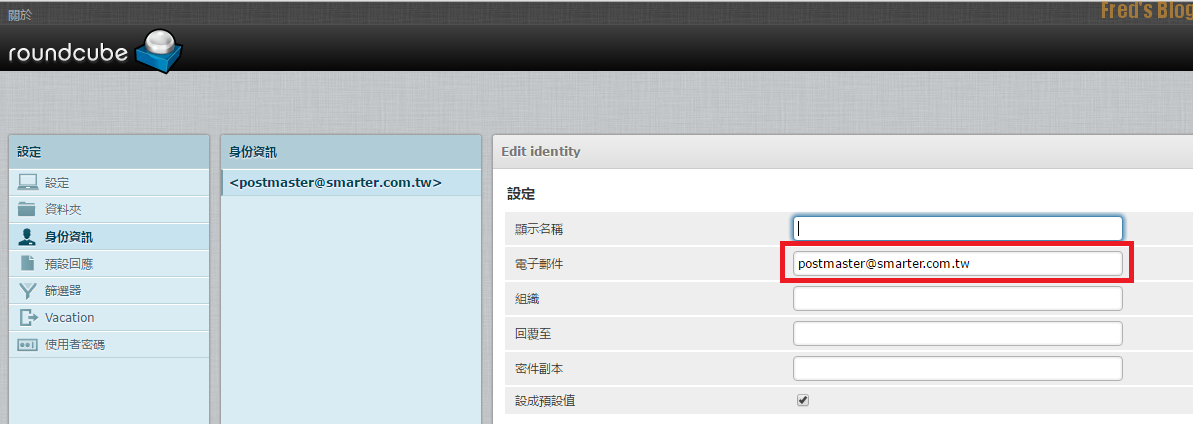
$config['username_domain'] = 'smarter.com.tw'; 移除//
$config['mime_types'] = '/etc/mime.types';
重啟服務
#systemctl restart nginx
再次確認登入roundcubemail
2-2.關閉SPAM & 掃毒功能
#vi /etc/postfix/main.cf
#content_filter = smtp-amavis:[127.0.0.1]:10024
#vi /etc/postfix/master.cf
#-o content_filter=smtp-amavis:[127.0.0.1]:10026
停止&關閉 amavisd
#systemctl stop amavisd
#systemctl disable amavisd
停止&關閉clamd
#systemctl stop [email protected]
#systemctl disable [email protected]
2-3.客製登入頁面
更換roundcubemail Logo
檔案路徑如下:
/var/www/roundcubemail/skins/larry/images
更換登入Title
#vi /var/www/roundcubemail/config/defaults.inc.php
...省略...
// Name your service. This is displayed on the login screen and in the window title
$config['product_name'] = '詩嫚特 Webmail';
...省略...
3.設定SMTP SASL
設定透過SMTP SASL認證後寄出
#vi /etc/postfix/main.cf
#
# Enable SASL authentication on port 25 and force TLS-encrypted SASL authentication.
# WARNING: NOT RECOMMENDED to enable smtp auth on port 25, all end users should
# be forced to submit email through port 587 instead.
#
smtpd_sasl_auth_enable = yes
smtpd_tls_auth_only = yes
smtpd_sasl_security_options = noanonymous
#移除上面三行#
# hostname
#確認網域設定
myhostname = mail.smarter.com.tw
myorigin = mail.smarter.com.tw
mydomain = smarter.com.tw
重新啟動服務
#systemctl reload postfix
4.結合AD認證
詢問AD 使用者帳號是否存在
#ldapsearch -x -h 192.168.1.66 -D 'fred' -W -b 'dc=smarter,dc=com,dc=tw'
Enter LDAP Password:
確認正常後,開始設定postfix 結合AD
#postconf -e virtual_alias_maps=''
#postconf -e sender_bcc_maps=''
#postconf -e recipient_bcc_maps=''
#postconf -e relay_domains=''
#postconf -e relay_recipient_maps=''
#postconf -e sender_dependent_relayhost_maps=''
#postconf -e smtpd_sasl_local_domain='smarter.com.tw'
#postconf -e virtual_mailbox_domains='smarter.com.tw'
#postconf -e transport_maps='hash:/etc/postfix/transport'
#postconf -e smtpd_sender_login_maps='proxy:ldap:/etc/postfix/ad_sender_login_maps.cf'
#postconf -e virtual_mailbox_maps='proxy:ldap:/etc/postfix/ad_virtual_mailbox_maps.cf'
#postconf -e virtual_alias_maps='proxy:ldap:/etc/postfix/ad_virtual_group_maps.cf'
#vi /etc/postfix/transport
smarter.com.tw dovecot
#postmap hash:/etc/postfix/transport
#vi /etc/postfix/ad_sender_login_maps.cf
#紅字部分需修改與AD環境相同
server_host = 192.168.1.66
server_port = 389
version = 3
bind = yes
start_tls = no
bind_dn = smarter\administrator
bind_pw = password
search_base = dc=smarter,dc=com,dc=tw
scope = sub
query_filter = (&(userPrincipalName=%s)(objectClass=person)(!(userAccountControl:1.2.840.113556.1.4.803:=2)))
result_attribute= userPrincipalName
debuglevel = 0
#vi /etc/postfix/ad_virtual_mailbox_maps.cf
#紅字部分需修改與AD環境相同
server_host = 192.168.1.66
server_port = 389
version = 3
bind = yes
start_tls = no
bind_dn = smarter\administrator
bind_pw = passwd
search_base = dc=smarter,dc=com,dc=tw
scope = sub
query_filter = (&(objectclass=person)(userPrincipalName=%s))
result_attribute= userPrincipalName
result_format = %d/%u/Maildir/
debuglevel = 0
#vi /etc/postfix/ad_virtual_group_maps.cf
#紅字部分需修改與AD環境相同
server_host = 192.168.1.66
server_port = 389
version = 3
bind = yes
start_tls = no
bind_dn = smarter\administrator
bind_pw = password
search_base = dc=smarter,dc=com,dc=tw
scope = sub
query_filter = (&(objectClass=group)(sAMAccountName=%u))
special_result_attribute = member
leaf_result_attribute = mail
result_attribute= userPrincipalName
debuglevel = 0
移除main.cf 設定
#vi /etc/postfix/main.cf
#check_policy_service inet:127.0.0.1:7777
驗證postfix AD結合
驗證帳號是否存在
# postmap -q [email protected] ldap:/etc/postfix/ad_virtual_mailbox_maps.cf
smarter.com.tw/fred/Maildir/
驗證群組帳號是否存在
# postmap -q [email protected] ldap:/etc/postfix/ad_virtual_group_maps.cf
[email protected],[email protected]
寄件者登入驗證
# postmap -q [email protected]
ldap:/etc/postfix/ad_sender_login_maps.cf
[email protected]
開始設定Dovecot結合AD
#vi /etc/dovecot/dovecot-ldap.conf
#紅字部分需修改與AD環境相同
hosts = 192.168.1.66:389
ldap_version = 3
auth_bind = yes
dn = smarter\administrator
dnpass = password
base = dc=smarter,dc=com,dc=tw
scope = subtree
deref = never
user_filter = (&(userPrincipalName=%u)(objectClass=person)(!(userAccountControl:1.2.840.113556.1.4.803:=2)))
pass_filter = (&(userPrincipalName=%u)(objectClass=person)(!(userAccountControl:1.2.840.113556.1.4.803:=2)))
pass_attrs = userPassword=password
default_pass_scheme = CRYPT
user_attrs = =home=/var/vmail/vmail1/%Ld/%Ln/Maildir/,=mail=maildir:/var/vmail/vmail1/%Ld/%Ln/Maildir/
4-1.透過WebMail修改AD密碼
因為預設password plugin 修改AD的密碼較為複雜,先把預設password plugin給關閉,關閉方式如下:
#vi /var/www/roundcubemail/config/config.inc.php
...省略....
// PLUGINS
//$config['plugins'] = array('managesieve', 'password');
...省略...
使用RD Web Access更改密碼,修改登入頁面,並建立修改密碼頁面
#vi /var/www/roundcubemail/skins/larry/templates/login.html
...省略....
<roundcube:object name="logo" src="/images/roundcube_logo.png" id="logo" />
<roundcube:form name="form" method="post">
<roundcube:object name="loginform" form="form" size="40" submit=true />
<a href="http://192.168.1.69" target="_blank" style="text-decoration:none;color:red;">修改密碼</a>
</form>
</div>
<div class="box-bottom" role="complementary">
...省略...
4-2.限制使用者Email空間大小
限制帳號空間大小(10G),結合AD後無法從mailbox_size_limit 限制信箱空間須從以下設定
#vi /etc/dovecot/dovecot.conf
plugin {
 [... omit other settings here ...]

 # Format: integer number + M/G/T (M -> MB, G -> GB, T -> TB).
 quota_rule = *:storage=10G
}
4-3.限制使用者單封信件大小
限制單封信件大小(10M) For Postfix
#postconf -e message_size_limit='10240000'
#postfix reload
4-4.限制roundcubemail夾帶檔案大小
限制夾帶(10M) For Nginx
#vi /etc/nginx/nginx.conf
省略...
client_max_body_size 10m;
省略...
#systemctl restart nginx
開始設定通訊錄結合AD
刪除舊有LDAP設定參數
#vi /var/www/roundcubemail/config/config.inc.php
#紅字部分需修改與AD環境相同
#
# "sql" is personal address book stored in roundcube database.
# "global_ldap_abook" is the new LDAP address book for AD, we will create it below.
#
$config['autocomplete_addressbooks'] = array("sql", "global_ldap_abook");

#
# Global LDAP Address Book with AD.
#
$config['ldap_public']["global_ldap_abook"] = array(
 'name' => 'Global Address Book',
 'hosts' => array("192.168.1.66"), // <- Set AD hostname or IP address here.
 'port' => 389,
 'use_tls' => false, // <- Set to true if you want to use LDAP over TLS.
 'ldap_version' => '3',
 'network_timeout' => 10,
 'user_specific' => false,

 'base_dn' => "dc=smarter,dc=com,dc=tw", // <- Set base dn in AD
 'bind_dn' => "smarter\administrator", // <- bind dn
 'bind_pass' => "password", // <- bind password
 'writable' => false, // <- Do not allow mail user write data back to AD.

 'search_fields' => array('mail', 'cn', 'sAMAccountName', 'displayname', 'sn', 'givenName'),

 // mapping of contact fields to directory attributes
 'fieldmap' => array(
 'name' => 'cn',
 'surname' => 'sn',
 'firstname' => 'givenName',
 'title' => 'title',
 'email' => 'mail:*',
 'phone:work' => 'telephoneNumber',
 'phone:mobile' => 'mobile',
 'street' => 'street',
 'zipcode' => 'postalCode',
 'locality' => 'l',
 'department' => 'departmentNumber',
 'notes' => 'description',
 'name' => 'cn',
 'surname' => 'sn',
 'firstname' => 'givenName',
 'title' => 'title',
 'email' => 'mail:*',
 'phone:work' => 'telephoneNumber',
 'phone:mobile' => 'mobile',
 'phone:workfax' => 'facsimileTelephoneNumber',
 'street' => 'street',
 'zipcode' => 'postalCode',
 'locality' => 'l',
 'department' => 'departmentNumber',
 'notes' => 'description',
 'photo' => 'jpegPhoto',
 ),
 'sort' => 'cn',
 'scope' => 'sub',
 'filter' => "(&(objectclass=person)(!(userAccountControl:1.2.840.113556.1.4.803:=2)))",
 'fuzzy_search' => true,
 'vlv' => false, // Enable Virtual List View to more
 // efficiently fetch paginated data
 // (if server supports it)
 'sizelimit' => '0', // Enables you to limit the count of
 // entries fetched. Setting this to 0
 // means no limit.
 'timelimit' => '0', // Sets the number of seconds how long
 // is spend on the search. Setting this
 // to 0 means no limit.
 'referrals' => false, // Sets the LDAP_OPT_REFERRALS option.
 // Mostly used in multi-domain Active
 // Directory setups
);
5.設定SSL憑證
5-1.取得Let’s Encrypt憑證
安裝EPEL repo
#yum install epel-release
使用Let’s Encrypt 憑證,透過官方建議的 Certbot 自動化工具設定
#yum install certbot
#certbot certonly
因為Web 服務已經啟動,故採用官方建議的webroot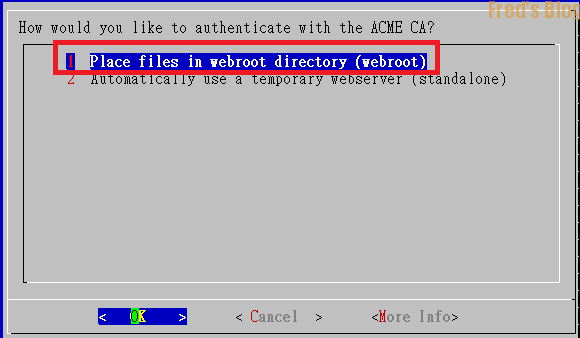
設定網域名稱
選擇Webroot (/var/www/html)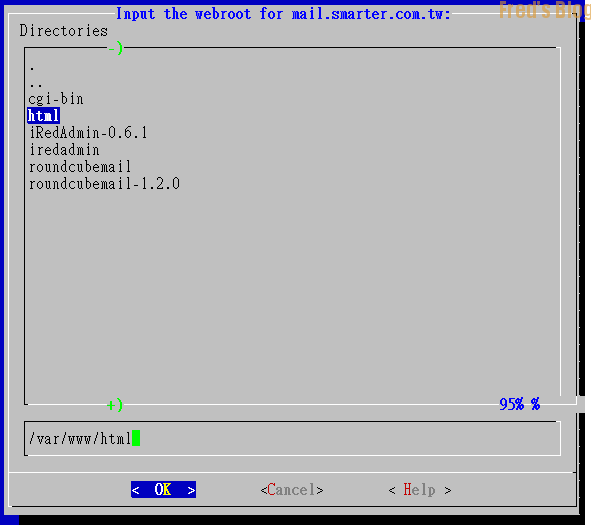
提示已經取得憑證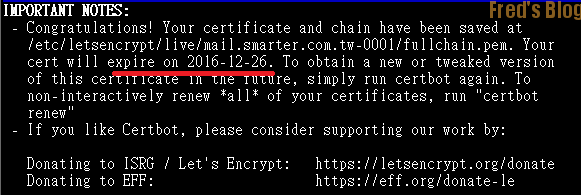
5-2.設定Nginx SSL憑證
#vi /etc/nginx/conf.d/00-default.conf
...部分省略...
ssl_certificate /etc/letsencrypt/live/mail.smarter.com.tw-0001/fullchain.pem;
ssl_certificate_key /etc/letsencrypt/live/mail.smarter.com.tw-0001/privkey.pem;
...部分省略...
重新啟動Nginx
#systemctl restart nginx
5-3.設定Postfix SSL憑證
#vi /etc/postfix/main.cf
...部分省略...
# TLS settings.
#
# SSL key, certificate, CA
#
smtpd_tls_key_file = /etc/letsencrypt/live/mail.smarter.com.tw-0001/privkey.pem
smtpd_tls_cert_file = /etc/letsencrypt/live/mail.smarter.com.tw-0001/fullchain.pem
smtpd_tls_CAfile = /etc/letsencrypt/live/mail.smarter.com.tw-0001/chain.pem
...部分省略...
重新啟動Postfix
#systemctl restart postfix
5-4.設定Dovecot SSL憑證
#vi /etc/postfix/main.cf
...部分省略...
# SSL: Global settings.
# Refer to wiki site for per protocol, ip, server name SSL settings:
# http://wiki2.dovecot.org/SSL/DovecotConfiguration
ssl_protocols = !SSLv2 !SSLv3
ssl = required
verbose_ssl = no
ssl_cert = </etc/letsencrypt/live/mail.smarter.com.tw/fullchain.pem
ssl_key = </etc/letsencrypt/live/mail.smarter.com.tw/privkey.pem.pem
...部分省略...
重新啟動Postfix
#systemctl restart dovecot
6.查詢Email Log
6-1.查找收件人
以收件人[email protected]為範例
#grep "to=<[email protected]>" /var/log/maillog
若信件太多只想要找固定時間點
#grep "to=<[email protected]>" /var/log/maillog | grep "Sep 6 14"
Sep 6 14:03:29 mail postfix/pipe[10115]: 601C0102D4B04: to=<[email protected]>, relay=dovecot, delay=0.15, delays=0.03/0.01/0/0.11, dsn=2.0.0, status=sent (delivered via dovecot service)
Sep 6 21:13:07 mail postfix/postscreen[14275]: NOQUEUE: reject: RCPT from [192.168.1.180]:53601: 550 5.5.1 Protocol error; from=<[email protected]>, to=<[email protected]>, proto=ESMTP, helo=<spam.chmost.com>
查找Queue ID 601C0102D4B04
#grep 601C0102D4B04 /var/log/maillo
Sep 6 14:03:29 mail postfix/smtpd[10112]: 601C0102D4B04: client=unknown[172.16.1.3]
Sep 6 14:03:29 mail postfix/cleanup[10114]: 601C0102D4B04: message-id=<HE1PR1001MB0876E61603AA94CB0BD4A6BECDF90@HE1PR1001MB0876.EURPRD10.PROD.OUTLOOK.COM>
Sep 6 14:03:29 mail postfix/qmgr[19780]: 601C0102D4B04: from=<[email protected]>, size=16897, nrcpt=1 (queue active)
Sep 6 14:03:29 mail postfix/pipe[10115]: 601C0102D4B04: to=<[email protected]>, relay=dovecot, delay=0.15, delays=0.03/0.01/0/0.11, dsn=2.0.0, status=sent (delivered via dovecot service)
Sep 6 14:03:29 mail postfix/qmgr[19780]: 601C0102D4B04: removed
6-2.查找IP
以IP 192.168.1.116 為範例
#grep 192.168.1.116 /var/log/maillog
Sep 5 18:28:13 mail postfix/postscreen[31095]: CONNECT from [192.168.1.116]:62280 to [172.16.1.4]:25
Sep 5 18:28:19 mail postfix/postscreen[31095]: PASS OLD [192.168.1.116]:62280
Sep 5 18:28:19 mail postfix/smtpd[31098]: connect from unknown[192.168.1.116]
Sep 5 18:28:19 mail postfix/smtpd[31098]: Anonymous TLS connection established from unknown[192.168.1.116]: TLSv1 with cipher AES128-SHA (128/128 bits)
Sep 5 18:28:19 mail postfix/smtpd[31098]: AA65B102C4184: client=unknown[192.168.1.116], sasl_method=LOGIN, [email protected]
Sep 5 18:28:22 mail postfix/smtpd[31098]: disconnect from unknown[192.168.1.116]
Sep 5 18:34:10 mail postfix/anvil[31100]: statistics: max connection rate 1/60s for (smtpd:192.168.1.116) at Sep 5 18:28:19
Sep 5 18:34:10 mail postfix/anvil[31100]: statistics: max connection count 1 for (smtpd:192.168.1.116) at Sep 5 18:28:19
Sep 6 09:07:39 mail postfix/postscreen[7209]: CONNECT from [192.168.1.116]:49384 to [172.16.1.4]:25
Sep 6 09:07:39 mail postfix/postscreen[7209]: PASS OLD [192.168.1.116]:49384
Sep 6 09:07:39 mail postfix/smtpd[7303]: connect from unknown[192.168.1.116]
Sep 6 09:07:39 mail postfix/smtpd[7303]: Anonymous TLS connection established from unknown[192.168.1.116]: TLSv1 with cipher AES128-SHA (128/128 bits)
Sep 6 09:07:40 mail postfix/smtpd[7303]: 1D952102C4175: client=unknown[192.168.1.116], sasl_method=LOGIN, [email protected]
Sep 6 09:07:42 mail postfix/smtpd[7303]: disconnect from unknown[192.168.1.116]
Sep 6 09:11:02 mail postfix/anvil[7305]: statistics: max connection rate 1/60s for (smtpd:192.168.1.116) at Sep 6 09:07:39
Sep 6 09:11:02 mail postfix/anvil[7305]: statistics: max connection count 1 for (smtpd:192.168.1.116) at Sep 6 09:07:39
查找Queue ID AA65B102C4184
#grep AA65B102C4184 /var/log/maillo
Sep 5 18:28:19 mail postfix/smtpd[31098]: AA65B102C4184: client=unknown[192.168.1.116], sasl_method=LOGIN, [email protected]
Sep 5 18:28:19 mail postfix/cleanup[31103]: AA65B102C4184: message-id=<000901d20760$344b4a50$9ce1def0$@[email protected]>
Sep 5 18:28:20 mail postfix/qmgr[19780]: AA65B102C4184: from=<[email protected]>, size=6310206, nrcpt=1 (queue active)
Sep 5 18:28:21 mail postfix/smtp[31104]: AA65B102C4184: to=<[email protected]>, relay=172.16.1.3[172.16.1.3]:25, delay=1.4, delays=0.54/0.01/0.02/0.82, dsn=2.0.0, status=sent (250 Ok: queued as 68F0D384043)
Sep 5 18:28:21 mail postfix/qmgr[19780]: AA65B102C4184: removed